
Manage an Existing Regatta
Editing Participant Information
To edit information about a participant, including boat details, scroll to find the participant in the entry list or type their name in the text box at the top of the page and then click on that participant. Now we will go through the different functions available to edit a participant’s registration.
Sailors
If you need to edit information about a sailor, simply scroll down and click the edit button next to the fields you would like to edit. If you need to add a new crew member, click on the “+sailor” button under Sailor details to add and edit information about the crew.
Boat Class/Division
To edit a sailor’s class or division, click on the Class tab at the top of the participant's information. Here you will see what class/division they have registered for. To edit, click into the class and click on “Change Class or Division.” Now you can select the class or division you would like to move the participant to
Race Area
Racing circles are designated areas where races are conducted to ensure fair competition, organization, and safety. They help separate fleets, manage traffic, and provide consistent racing conditions by optimizing course placement. You can create race areas in Clubspot under Settings > Race Area. There, you’ll assign a fleet to a specific race area.
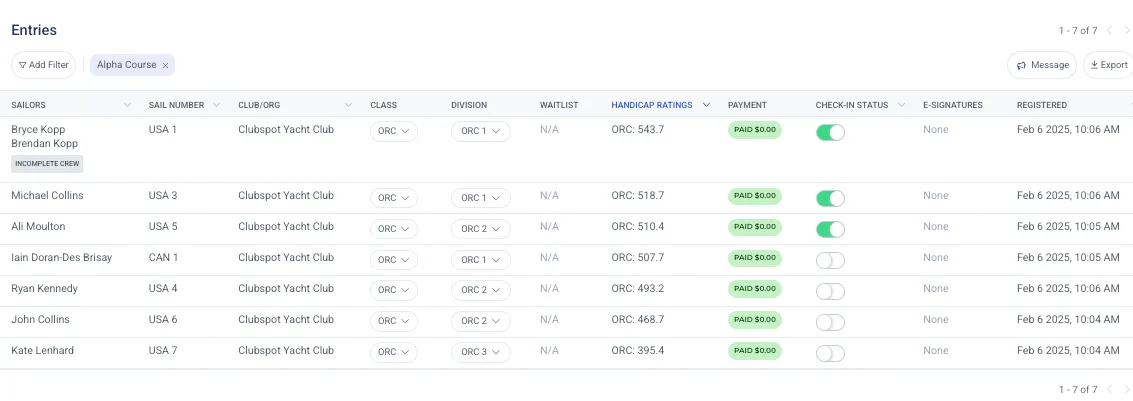
The entry list can be filtered by race area, which simplifies the process of on-water check-in for a given race area. The scoring panel can also be filtered by race area so the scorer only sees boats racing in their area.
Boat Details
To edit a participant's boat details, click on the Boat tab at the top and edit the boat information by clicking the Edit button to the right.
Accepting a participant from the waitlist
To accept a participant from the waitlist, click on the class they’ve registered for (as described above) and instead of clicking Change Class or Division,” click on “Accept from waitlist.”
Please note: when you accept someone from the waitlist, it does not automatically charge them. You will need to go the Billing tab at the top, scroll down to the Invoices section, click on the draft invoice created from the waitlist, and click “Finalize Invoice.”
Billing & Refunds
Under the Billing tab, you can view the payments of the original registration and have the ability to issue refunds or issue invoices for additional charges.
Issue a refund
To issue a refund, scroll down to the Payments section and click on the payment to trigger a dropdown. If you scroll down after clicking on the payment, there is a button for Issue Refund. When you click this you can either refund the full amount or change the amounts of each line item to issue a partial refund. Once you’re done editing, click the blue Refund button in the pop-up.
Please Note: when issuing a refund, the dollar amounts that show up are the amounts you would like to return to the customer. For example, if the participant paid $100 but you want to issue a partial refund and keep 20% of the original payment, you would click issue refund and change the line item amount from $100 to $80.
Issue a new invoice
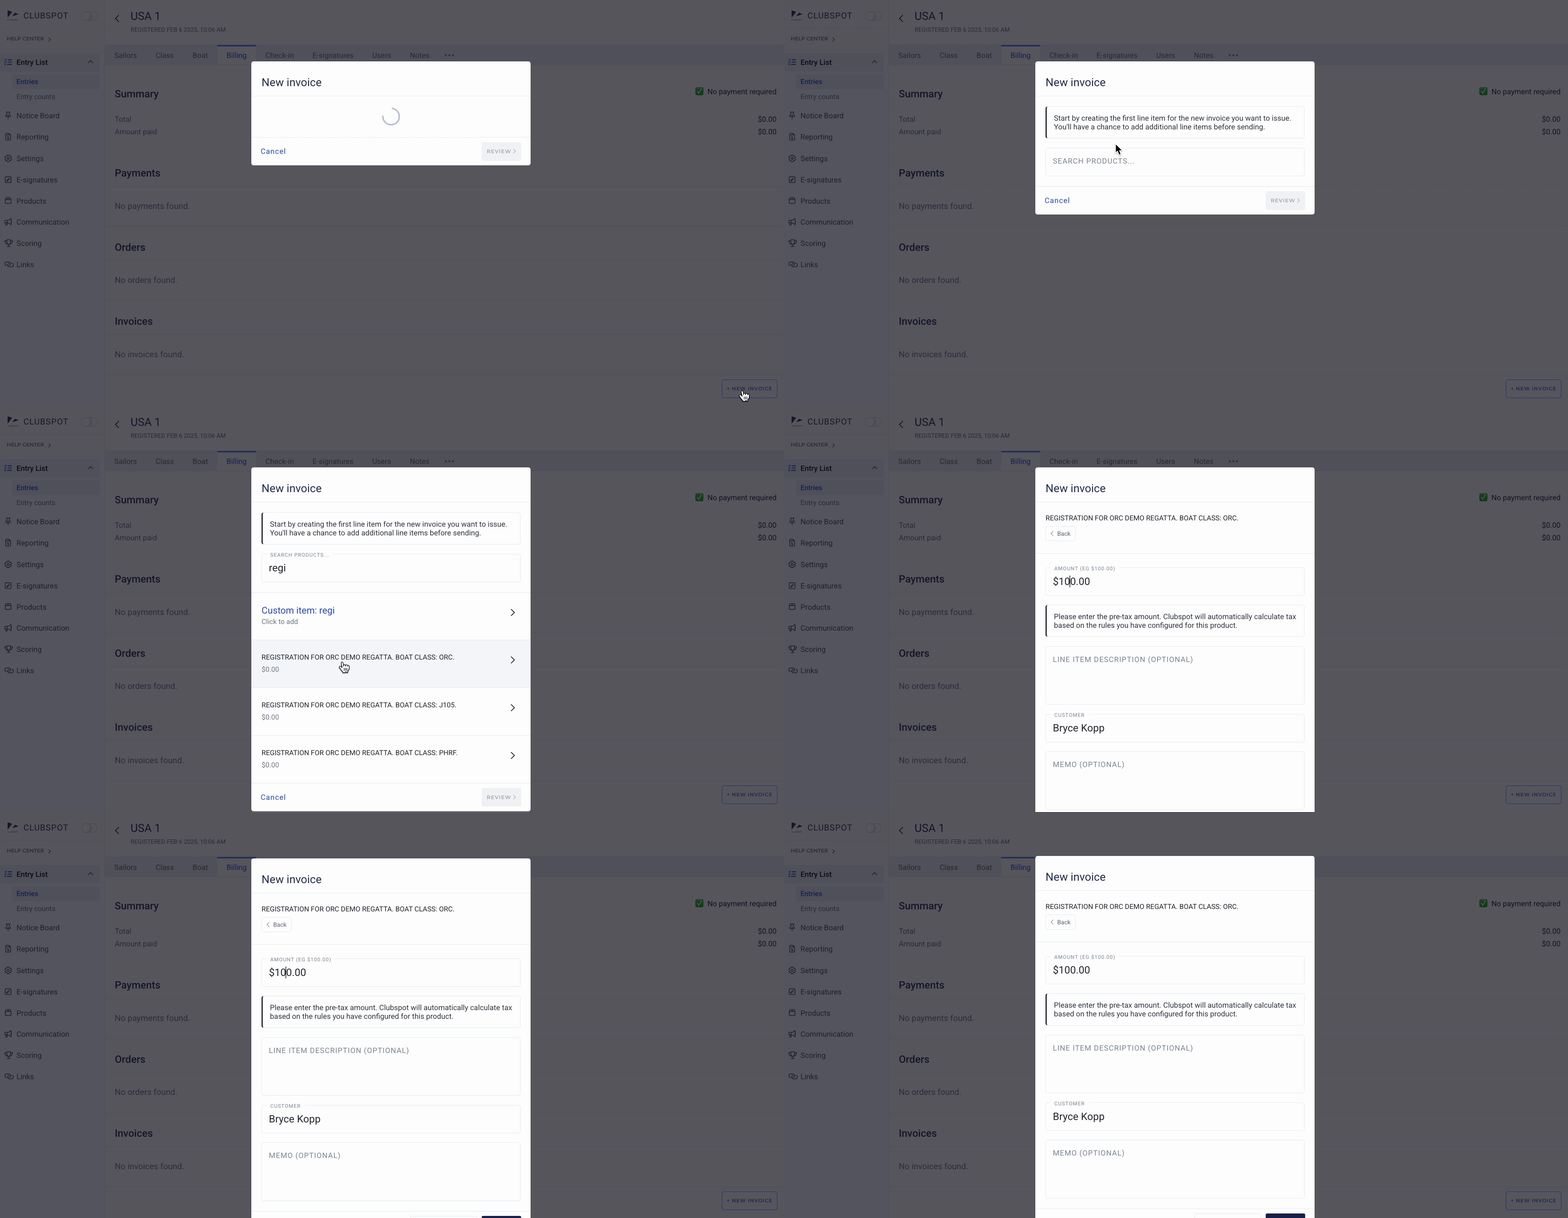
If you’d like to issue a new invoice for a new or custom amount, you can do so by scrolling down to Invoices and clicking “+new invoice”. This will prompt you to search for the product you would like to invoice for (for example, an entry fee, or a merchandise item).
For a regatta, the entry fee products will have the name of the boat class, so you can search for that.
Once you select a product, you can then enter an amount and description, then click Next Step.
If you would like to send an invoice with multiple line items, click Add More Line Items on the final step. This will save a draft invoice that you can add any number of line items to, prior to sending it to the customer.
If you only want to invoice for a single line item, then you are now ready to create the invoice.
When finalizing the invoice, you will see the default invoicing option to email the customer. If there are any payment methods on file for this registration you will also see an option to charge the invoice directly to one of those payment methods.
Check-in
To use the electronic check-in feature, you can switch the ‘check-in’ toggle on the entry list. Alternatively, you can click on the check-in tab on the participant and change the status of the participant to “Checked-in.”
E-signatures
To view the waiver the participant signed, click on the E-signatures tab at the top (not to the left) and click on the signed document. You also have the option to send the participant (or their parent) another copy of the waiver by clicking the “Request New Contract” button.
Exports
You can export documents to be printed and circulated. For example, many organizers like to have a check-in sheet for on the water check-ins. The best way to do this is go to the Entry List, click the Filter button, filter to a specific class and press Apply Filter, then click the export button in the top right and click “Scratch Sheet.” You can also export the list of every boat at the regatta (not class by class) by simply not applying the filter and go straight to Export and then Scratch Sheet.
If you’d like to export or print the results, go to the Links tab, click on the Results page link, then click on the More button in the top right corner. This will give you the option to print the results right there, or copy the results and you can then paste the results into a spreadsheet before printing.
Communications
You can send SMS text messages or emails to participants through Clubspot. Go to the Entry List and click on the MSG button to the right. There, you can select what type of communication method you want to use and then type the message. If you need to only communicate with a specific class instead of the entire regatta, use the filter button to apply a filter on the Entry list and then click on the MSG button.