
Camps
Camps in Clubspot allow you to manage multi-day programs, registrations, and participant details in one place. Whether you’re running youth camps, clinics, or seasonal programs, Camps helps you handle sign-ups, capacity, and scheduling with ease.
Creating a camp
The fastest way to set up a new camp is to clone a previous camp. Cloning will copy over all of the settings from the original camp, including all classes and sessions. When you clone a camp, be sure to update the dates for your new camp (including dates for any sessions you have configured).
If you’d rather start from scratch, it’s easy to create a new camp. Just go to the Events > Camps tab in your club dashboard and click the + button to get started.
Format & Hierarchy
Camps are designed on the hierarchy of:
Camp - your seasonal or main programming (e.g., 2024 Junior Program)
Class - the unique content offerings (e.g., Beginner, Intermediate, Advanced)
Session - the availability of each class (e.g., Week 1, Week 2, Half Season, Full Season)
Programs - Programs allow you to group classes into different sections. For instance, you might have a separate program for Tennis, Sailing, and Swimming, each with its own classes (eg. Beginner, Intermediate, Advanced). All of these programs can then live within one camp in an organized fashion, which makes it very easy for participants to sign up for multiple activities simultaneously, and easy for you to find the information you need as an administrator.
Although this is the intended hierarchy, we've seen lots of different use cases from our users. If you aren't sure how your Camp setup would fit this model, reach out and we'll help you out!
Setting up a Camp
Settings
The first sub-tab under Settings is Administrators. This is where you can add other administrators to help manage the regatta. To add an administrator, click on the “+ New Admin” button to the right. There, you will be prompted to enter in the first name, last name and email of the new administrator. On the next step, you can choose what access level this administrator will have.
Full Access gives them access to make edits to any part of this specific camp.
Basic Access restricts administrators to only view and export information in the camp (including checking in participants). Most junior programs will add their instructors/counselors as basic admins, so they have access to all participants’ emergency/medical info.
Basic Details
The next sub-tab under Settings is Basic Details. Here you can edit the name of the camp, the dates, the entry deadline, and more. In addition, you can list registration help/notes in the text box below. These notes will be accessible for registrants on the registration screen if they have any issues registering.
BASICS
Name: To change the name of the Camp
Address: To change the posted location of the Camp
Visibility: Toggle Published on if you want your camp to show up on your Clubspot-Powered Website
Dates: Set your Start Date/End Date and the Entry Deadline for the entire program
REGISTRATION
Online sign-ups (Open/Closed/Scheduled): This turns the entire camp registration ON or OFF. You can also choose scheduled to determine when registrations for different classes will open and close.
Members only (On/Off): This toggle does different things for two different types of users
If your entire club uses Clubspot (full stack), this toggle indicates whether someone needs to be a member of the club to register.
If your club does not use Clubspot for website management (pay as you go), this toggle indicates whether someone needs a Clubspot account to register.
By default, the Online sign-ups toggle is set to Open. If you would like to initially prevent participants from signing up, change the toggle to “Closed” and when you are ready to launch registration, just change the toggle back to “Open”
Inbound Payments
Here, you can configure which payment methods are allowed at checkout. Toggle the payment methods you would like to allow participants to pay with at checkout. For example, if Credit Cards & ACH are the only toggles in green, participants can only register by paying with either of those methods online, and will not be able to register by paying via check or cash.
Classes
This is where you will set up the classes that you want to offer for your camp. Click the plus button to add your first class. Once you’ve created the class, click into the class to view the settings of that specific class. There are a few edits you can make to a class:
First, you should enter a Class Description in the text box. This description will appear on the registration page so it’s important to describe the purpose of the class, any prerequisites, the meeting times, etc.
If you scroll down further, you will see Status. Here you can set the class to be available or unavailable for new sign-ups.
Further down, you'll see advanced settings for the class. Here you can set an age requirement for the class by clicking the edit button, and you can set a minimum number of sessions required for this class (for example, participants must select at least two weeks of the sailing program).
Lastly, if you scroll all the way to the top, you will see a tab called “Subclasses.” Here, you can add subclasses under the class for registrations. When you add the subclasses, you can make the subclass selectable by the participant by clicking into the subclass and toggling on User Selection.
By default, the classes will be ordered from top to bottom alphabetically. If you would like to change the order of the classes you’ve created, click the four dots next to a class and drag to move up or down. The order of the classes in the dashboard will be the same order the participants see when registering.
Sessions
Adding sessions is where you configure which options are available for specific classes. For example, if your 8-week summer program allows participants to select specific weeks of a class, you will add 8 sessions titled “Week 1, Week 2, etc.” If your program only has the option to do 4 weeks at a time, you will only add two sessions “1st Half of Summer” and “2nd Half of Summer.”
To start setting up sessions, click the plus button.
Here, you will be prompted to enter the name of the session and set a start/end date for that session.
Once you’ve created your sessions, they will be available to all classes by default. If you would like to only offer sessions to certain classes, you can set this by clicking into a session, scrolling down and selecting the classes in which this session is available.
Programs
Programs allow you to group classes into different sections. For instance, you might have a separate program for Tennis, Sailing, and Swimming, each with their own classes (eg. Beginner, Intermediate, Advanced). All of these programs can then live within one camp in an organized fashion, which makes it very easy for participants to sign up for multiple activities simultaneously, and easy for you to find the information you need as an administrator.
Under Settings > Programs> '+', you are able to set up programs and tag the individual classes that correlate to the program.
Entry Fees
Under Settings > Entry Fees, you can adjust the entry fees for each individual session of your camp by simply clicking into each cell. If all class sessions share the same price, take a shortcut by clicking on the blue hyperlinked name of the class and setting the entry fee for all sessions at once!
You can also use date windows to configure "early" or "late" registration fees. To do this, click on + add date window next to the Regular fee at the top.
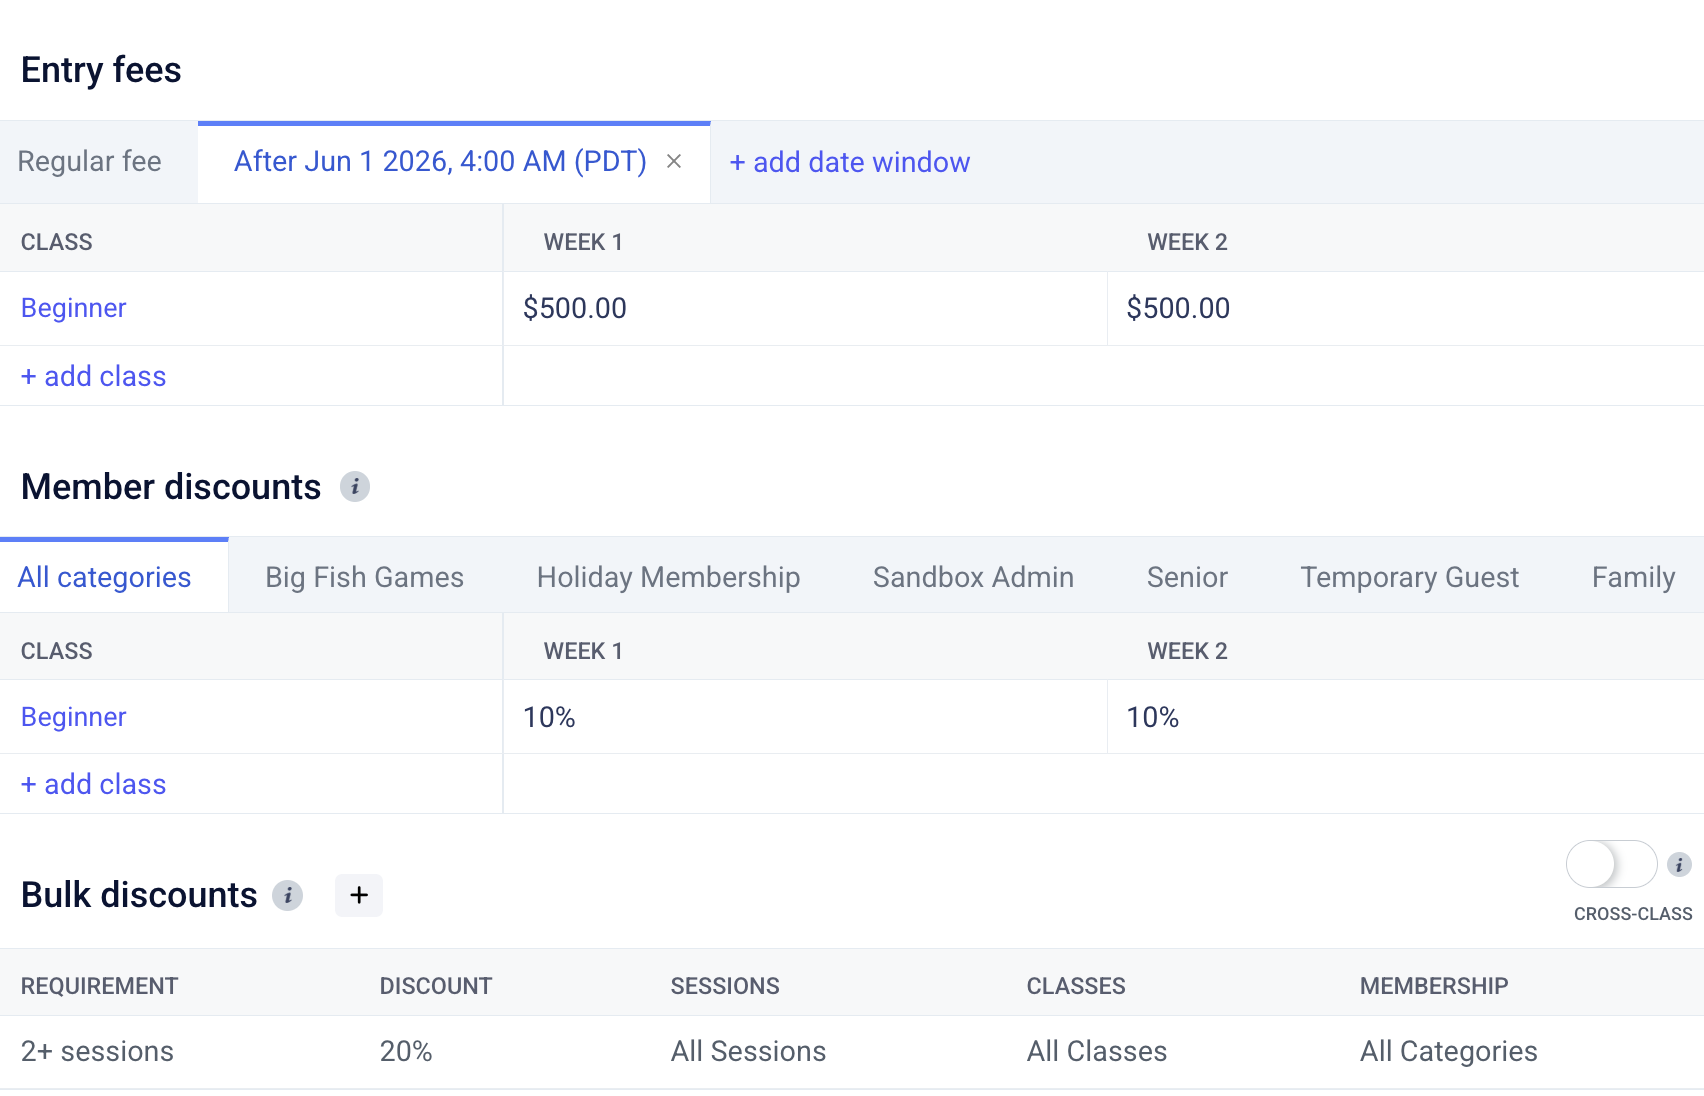
You can add discounts for members under Member Discounts, based off the membership categories you have entered in your club dashboard. To do so, click on each membership category displayed. Note that if you configure a discount for all categories and have one configured for a specific category, the category-specific discount will be the one applied.
To offer a discount for participants who want to sign up for more than one session of camp, you can enter a Bulk Discount. Click on “+ bulk discount” and adjust the dollar amount or percentage of the total entry fee. Then you can click the dropdown option to adjust the number of sessions required to receive the bulk discount.
Cross-class discounts count all of the participant's sessions (even across multiple classes). Standard discounts only count sessions within each individual class. To enable this, turn the Cross-Class toggle on.
Waitlist
Under Settings>Waitlist you can set entry caps on each session of your camp. Once a class meets its entry cap for that session subsequent registrations will be added to a waiting list.
Turn the Waitlist Updates toggle to Manual or Automatic depending on if you want registrants to be automatically added if a space becomes available. Clubspot will assign an initial waitlist status at the time of registration, but will NOT automatically move participants on or off the waiting list when you add entries, remove entries, or update entry caps.
Waitlisted participants will not be required to pay up front. Clubspot will automatically generate a draft invoice that you can send at a later date.
Membership
Clubspot works with a number of organizations and clubs to require membership validation for camps and regattas. If this is something you would like to require for participants to be able to register for your camp, you can click “+ Add Validation” then proceed to select that specific club or organization.
After adding the organization/club, click on the line item and you can select specific classes in your camp that you want the Membership Validation to apply to. You can also choose to make this membership validation required or optional during the registration flow.
Data Collection
Under Settings > Data Collection, you can configure the questions that will be asked during the registration process. Clubspot has a list of default questions that you can toggle on or off. You can also create custom questions by clicking “add a custom field”, then you can type your question and choose the answer type. To edit the answer options, click on the question, and then choose Options, here you can create the available answer options and configure any associated price adjustments as well.
Discount Codes & Coupons
Our “coupons” functionality allows a user to create either a hard dollar or percentage-based discount that can be claimed by registrants using a code in the registration flow. You can access this by clicking on the “coupons” tab nested below the “Settings” Heading on every camp and regatta
Products
Our product feature allows you to attach merchandise and other club products to your registration flow! Members will be able to view these products during their checkout process. To add a product, click on Products > '+'. You can choose an existing product or create a new one by entering the name and price.
Communication
Clubspot has a few options available for communicating with your participants as part of the confirmation message process and Camp communications.
Messages
The messages view allows you to see all past emails that you have sent out, and by clicking into an email, view the delivery status of each person the email was sent to.
Filtered Messages
You can also filter messages to send a bulk email to a specific group of participants. For example, those participants who still have 'incomplete e-signatures / waivers' to complete.
Confirmation Emails
Whenever a registration is processed for a Camp, Clubspot will send a confirmation message, a receipt (if a payment was processed), and an E-signature document (if activated). Clubspot has a default confirmation message with basic information, but the confirmation message can be customized.
To customize the Confirmation Email, click into the Communication section and choose Custom, then proceed to enter your information.
The FROM address for your Confirmation Emails can be updated in the Club Account Settings under Account Details
If an email is not provided, emails will come from no-reply@theclubspot.com
Links
The Links section is where you can find the external links you can use to share with registrants, post on your website, or post on social media. The following are the links provided, and what they are best used for:
Public Entry List: This link provides a list of all registered participants and a waitlist designation. If you would like to share the public entry list with participants, you should add this link to your website or share it via email. If you would like to disable the public entry list, do so in Basic Details.
Registration: This is the link to register for the camp. You should share it with parents or on your website for registrations.
Online Shop: This link can be shared specifically to anyone who wants to purchase Camp merchandise or other related items, either after they have registered or if they are not participating at all. This link is also available from the registration information in the participant's dashboard once registration is completed.