Clubspot Email
Clubspot provides robust bulk email functionality so you can easily communicate with members and registrants directly from the Dashboard.
Clubspot Email provides a drag-and-drop editor, AI-powered editing capabilities, a template library (including pre-made templates), an image asset library, supercharged delivery rates, granular reporting on opens, bounces, and much more.
FYI: Clubspot Email replaces the legacy MailChimp integration.
Feature overview
Sending emails
Bulk emails are embedded directly in the Clubspot dashboard, making it easy to message any group on demand. As an example, if you want to email a list of members, you can click the Message button from the Members dashboard. If you’d like to email a list of participants for an upcoming Social Event, click the Message button from the RSVP list for that specific event.
All emails are auto-saved as you draft them, to ensure you don’t lose progress on your email as you make changes.
Edit modes
When you draft a bulk email, you can choose from the following edit modes:
1) Basic: Designed for simple messages, with basic text formatting (just like a standard email you might send from Gmail). As an example, you could use Basic mode to message Social Event attendees about a last-minute venue change due to weather.
2) Advanced: Perfect for bulk messages that require drag-and-drop design, templating, images, videos, or other content. As an example, you might use the Advanced mode for an event flyer, or a club newsletter. Advanced mode allows you to use Templates (see below).
You can (and should) use both edit modes in tandem for different contexts, depending on what you’d like to communicate.
Templates
When editing in Advanced mode, you can take advantage of Clubspot’s robust templating solution. This includes a template library, where you can save any number of templates for future use, as well as suggested templates that Clubspot has already provided for you as a starting point. To get started, you can build and save templates under the Communication > Email Templates section of your dashboard. To send an email using a template, simply select the ‘Advanced’ mode when drafting your message.

Drag and drop (with AI)
When you’re editing an email (or a template) you can drag and drop content, blocks, and edit global (body) styles to achieve the perfect design for your email.
Easily move text, images, and other elements within your email using Unlayer's intuitive drag and drop interface.
Reorganize sections by simply dragging them to the desired location, enhancing user experience with quick adjustments and customizations.
Add, remove, or rearrange blocks to create a structured layout
Change fonts, colors, and spacing to create a cohesive design that applies universally across the entire email
Ensures an efficient workflow with minimal technical know-how required, making it easy to achieve professional-looking emails.
For detailed guidance on using the Unlayer Editor to enhance your email design, please refer to the Unlayer Documentation.
Reporting
You can view send statistics at a glance from the Communication > Sent emails tab. To see more detailed results, click into any email. Clubspot will show the open rate, bounce rate, and the entire list of recipients. If you want to check a specific recipient (or group of recipients), you can search in the recipient list, and/or filter by status (eg, Opened, Bounced, etc.).
Reputation & Unsubscribes
In order to keep your delivery rates high, it is important to maintain a strong reputation. This starts with sending content that is useful and well received by your recipients. It also means giving recipients a clear path to opt out (unsubscribe) from future communications.
Clubspot handles all of this for you, by adding an unsubscribe link to the bottom of each bulk email, and keeping track of any recipients who unsubscribe.
Unsubscribed recipients will appear in your global Suppression list (under Communication > Suppression list), and Clubspot will automatically filter them out from future emails unless/until they are re-subscribed. To re-subscribe a recipient, click the three dots on the right hand side of the email address and click the re-subscribe button! Clubspot also tracks automatic unsubscribes from bounced emails, and provides detailed reason codes directly from the recipient’s email service, giving you granular insight into why any given recipient has been unsubscribed.
Custom Email Profiles
You can now add custom email profiles. These profiles allow you to specify email addresses you send from frequently, showing them in a dropdown in the email editor. Additionally, you can set a profile name which will show in recipients' inboxes as the sender of the email.
To create a custom email profile, navigate to Communication > Domain settings, and click the plus next to 'Custom Email Profiles'. From here, specify the profile name (what you'd like to show up in the inbox of recipients), username, and domain ([username]@[domain]).
Benefits
This service was developed in-house to provide rock solid reliability, industry-best deliverability rates, and extra granular send statistics. Clubspot’s solution is built on top of AWS email infrastructure, so you can benefit from the power and robustness of Amazon Web Services.
Clubspot Email provides a number of advantages over traditional email services, including:
Improved deliverability: The Clubspot email service uses Amazon SES, a far more reliable solution at scale.
Improved use metrics: You'll be able to see when emails have been delivered, when they've been opened, when emails have bounced, and when and why users have unsubscribed from the mailing list.
Single platform experience: All emails started in Clubspot will stay in Clubspot. No more needing to navigate or maintain an external email list (eg. MailChimp).
Lower cost: Our email service is included as part of all Clubspot Full Stack contracts at no extra cost!
Setup
Enabling bulk emails via Clubspot is a simple, one-time process.
What you’ll need
Access to edit your email domain’s DNS records (eg. via GoDaddy, NameCheap, Google Domains, Network Solutions, etc.). If you do not have access to edit your DNS records, please contact your IT provider before getting started.
Full access or communications admin permissions on your Clubspot Dashboard.
Step 1: Add your Domain in Clubspot
Log in to your Clubspot dashboard > go to Communication > Email Domains > add a domain > and enter your domain name (the domain you send emails from).
Once your domain is added, click into it to reveal the necessary DNS records to ensure that we can get your domain verified and email up and running.
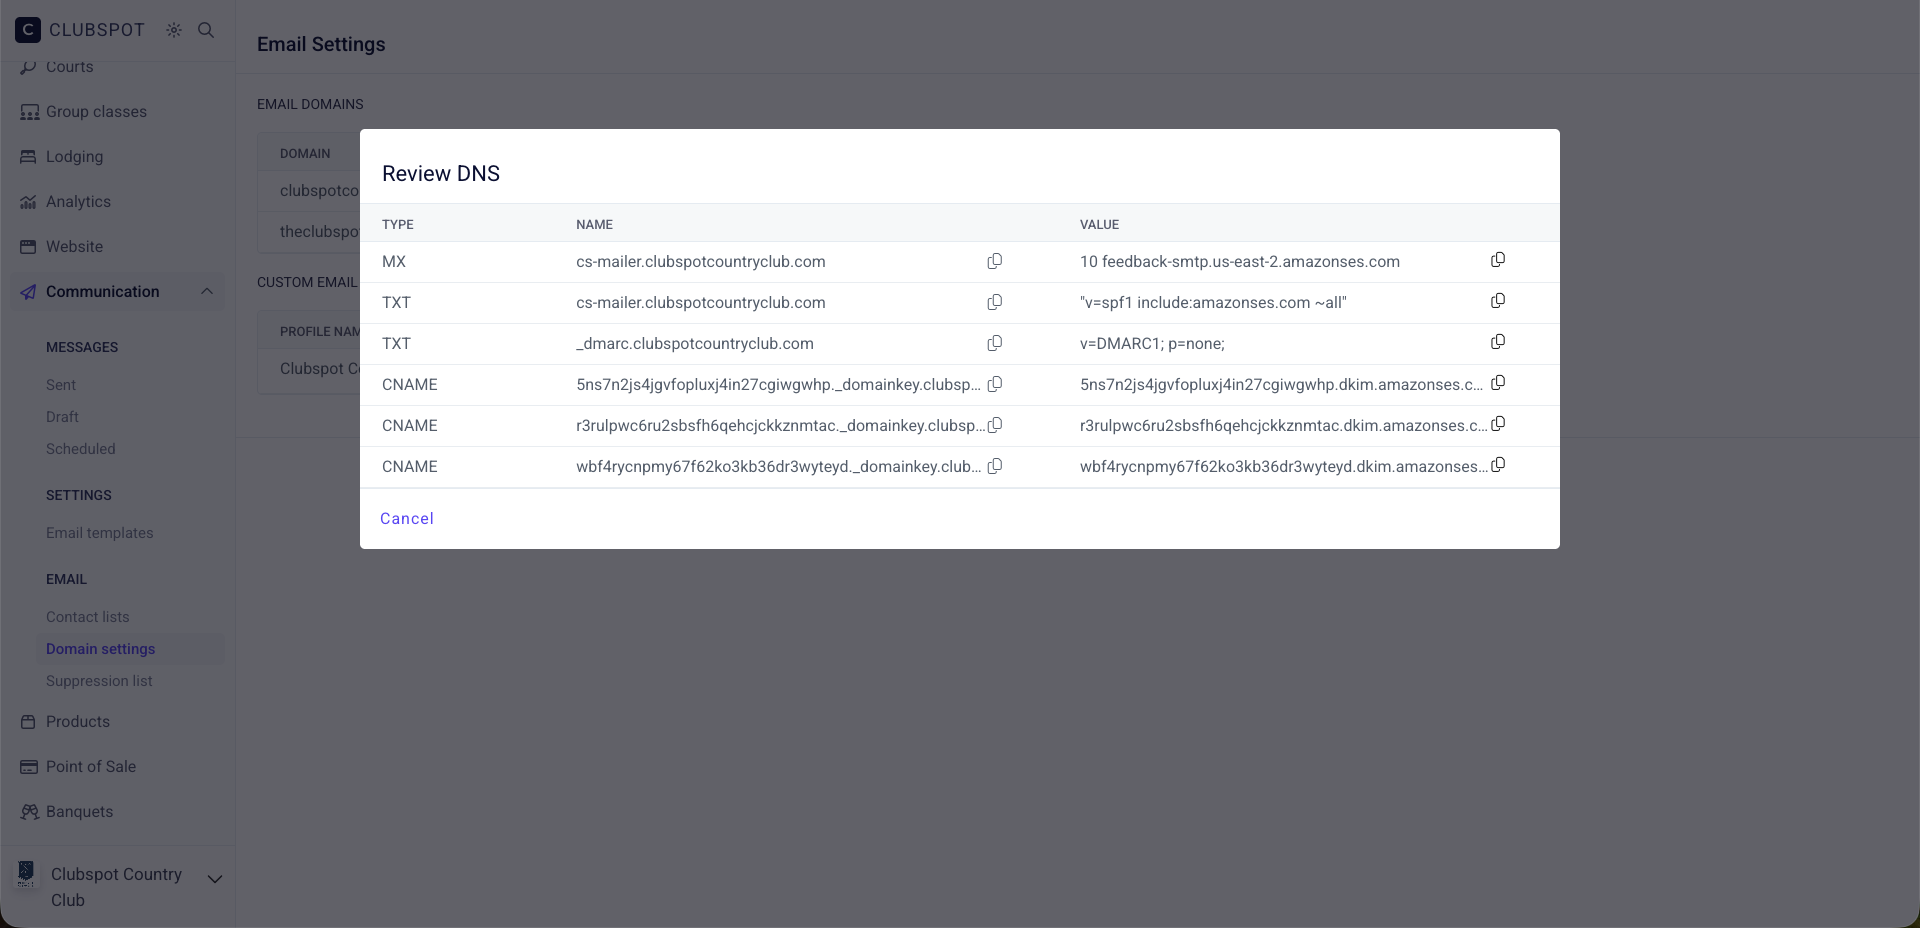
Step 2: Add DNS records to your domain host
Clubspot will then generate six records that need to be added to your DNS. To find these, click on the domain name you just added. Much like the cutover process to launch a Clubspot-hosted website, you (or your IT team) will need to log in to your domain host and add these records. Once these records have been added, Clubspot will validate them and you’ll be ready to send emails directly from the Dashboard.
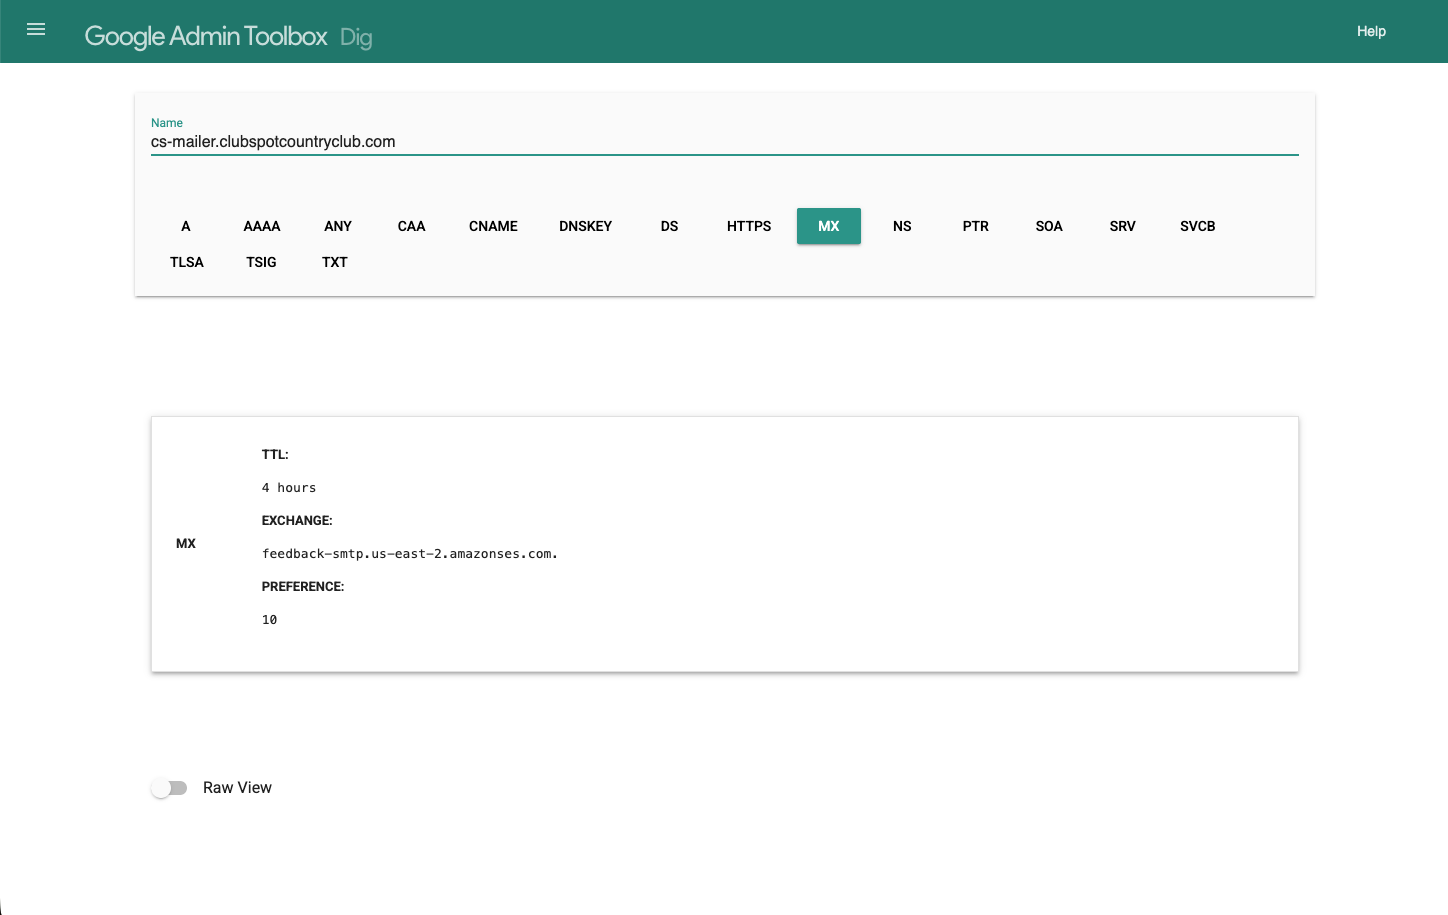
Note: The priority value for the MX record is always 10. The '10' does not need to be included in the value field.
Step 3: Validating DNS records
Clubspot will validate your DNS email settings for up to three days and show ‘Success' once the requested changes are available. Please reach out to our support team (support@theclubspot.com) if you need to reinitiate the validation after three days.
You (or your IT Team) can also validate these settings outside of Clubspot using a tool like ‘dig' in the Google Admin toolbox: https://toolbox.googleapps.com/apps/dig