
Regatta setup
Step 1: Create a Regatta
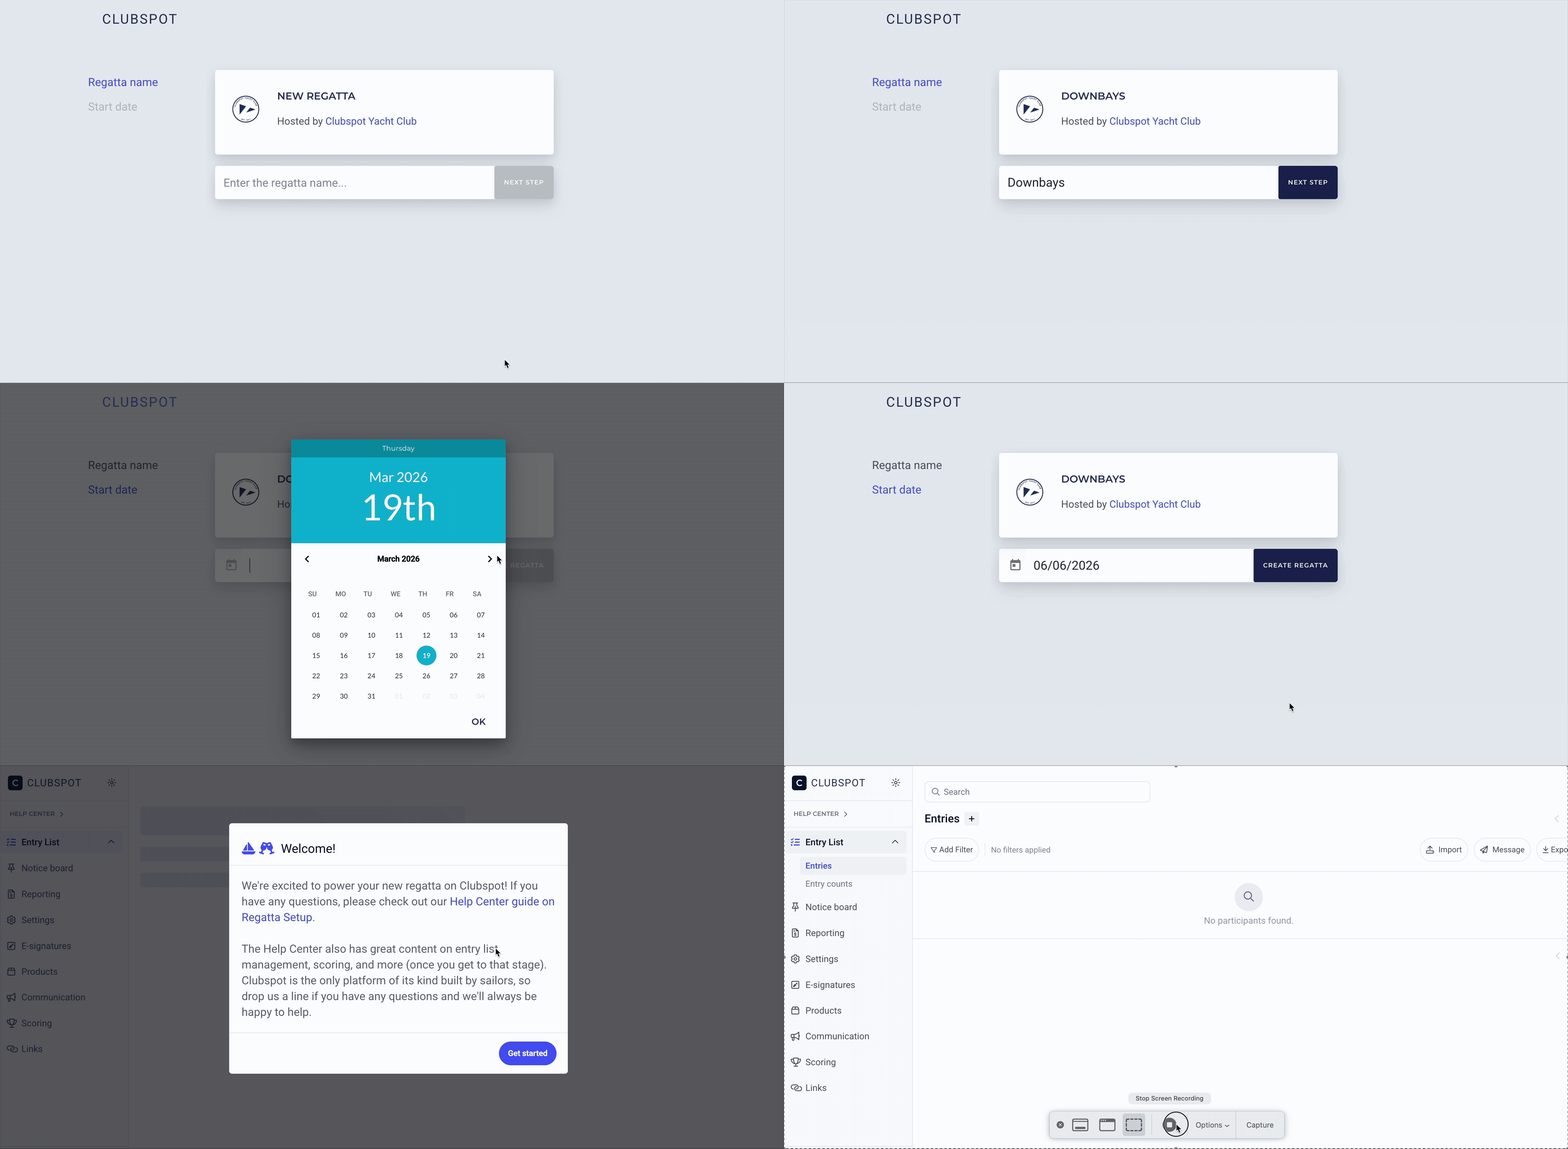
In the club dashboard, go to Events, Regattas, and then click “+ New Regatta” in the top right-hand corner. This will prompt you to create a name for the regatta and the start date. Once you complete that, it will bring you to your new regatta’s dashboard.
Step 2: Configure Regatta Settings
After you have created the regatta, it is now time to configure the regatta settings. If you would like to upload the NOR and/or SI’s, click on the Notice Board tab, click Race Docs and upload the PDF files from your computer. For other regatta settings, go to Settings and go through the sub-tabs from top to bottom.
The first subtab under Settings is Administrators. This is where you can add other administrators to help manage the regatta. To add an administrator, click on the “+ New Admin” button to the right. There, you will be prompted to enter in the first name, last name and email of the new administrator. On the next step, you can choose what access level this administrator will have.
Full Access gives them access to make edits to any part of this specific regatta.
Basic Access restricts administrators to only view and export information in the regatta (including checking in participants).
Scoring Access gives administrators access to enter scores in the regatta but not the same level of information access as a Full Administrator
If an Admin has Scoring access, they will be able to edit Participant data i.e. change class or update boat details as well as have access to all subtabs in the Scoring header. See an attached video example of Scorer Admin visibility.
The next subtab under Settings is Basic Details. Here you can edit information about the regatta (name, dates, event tags, etc) and upload a regatta image under the Main Image section.
Step 3: Configure Payment Methods
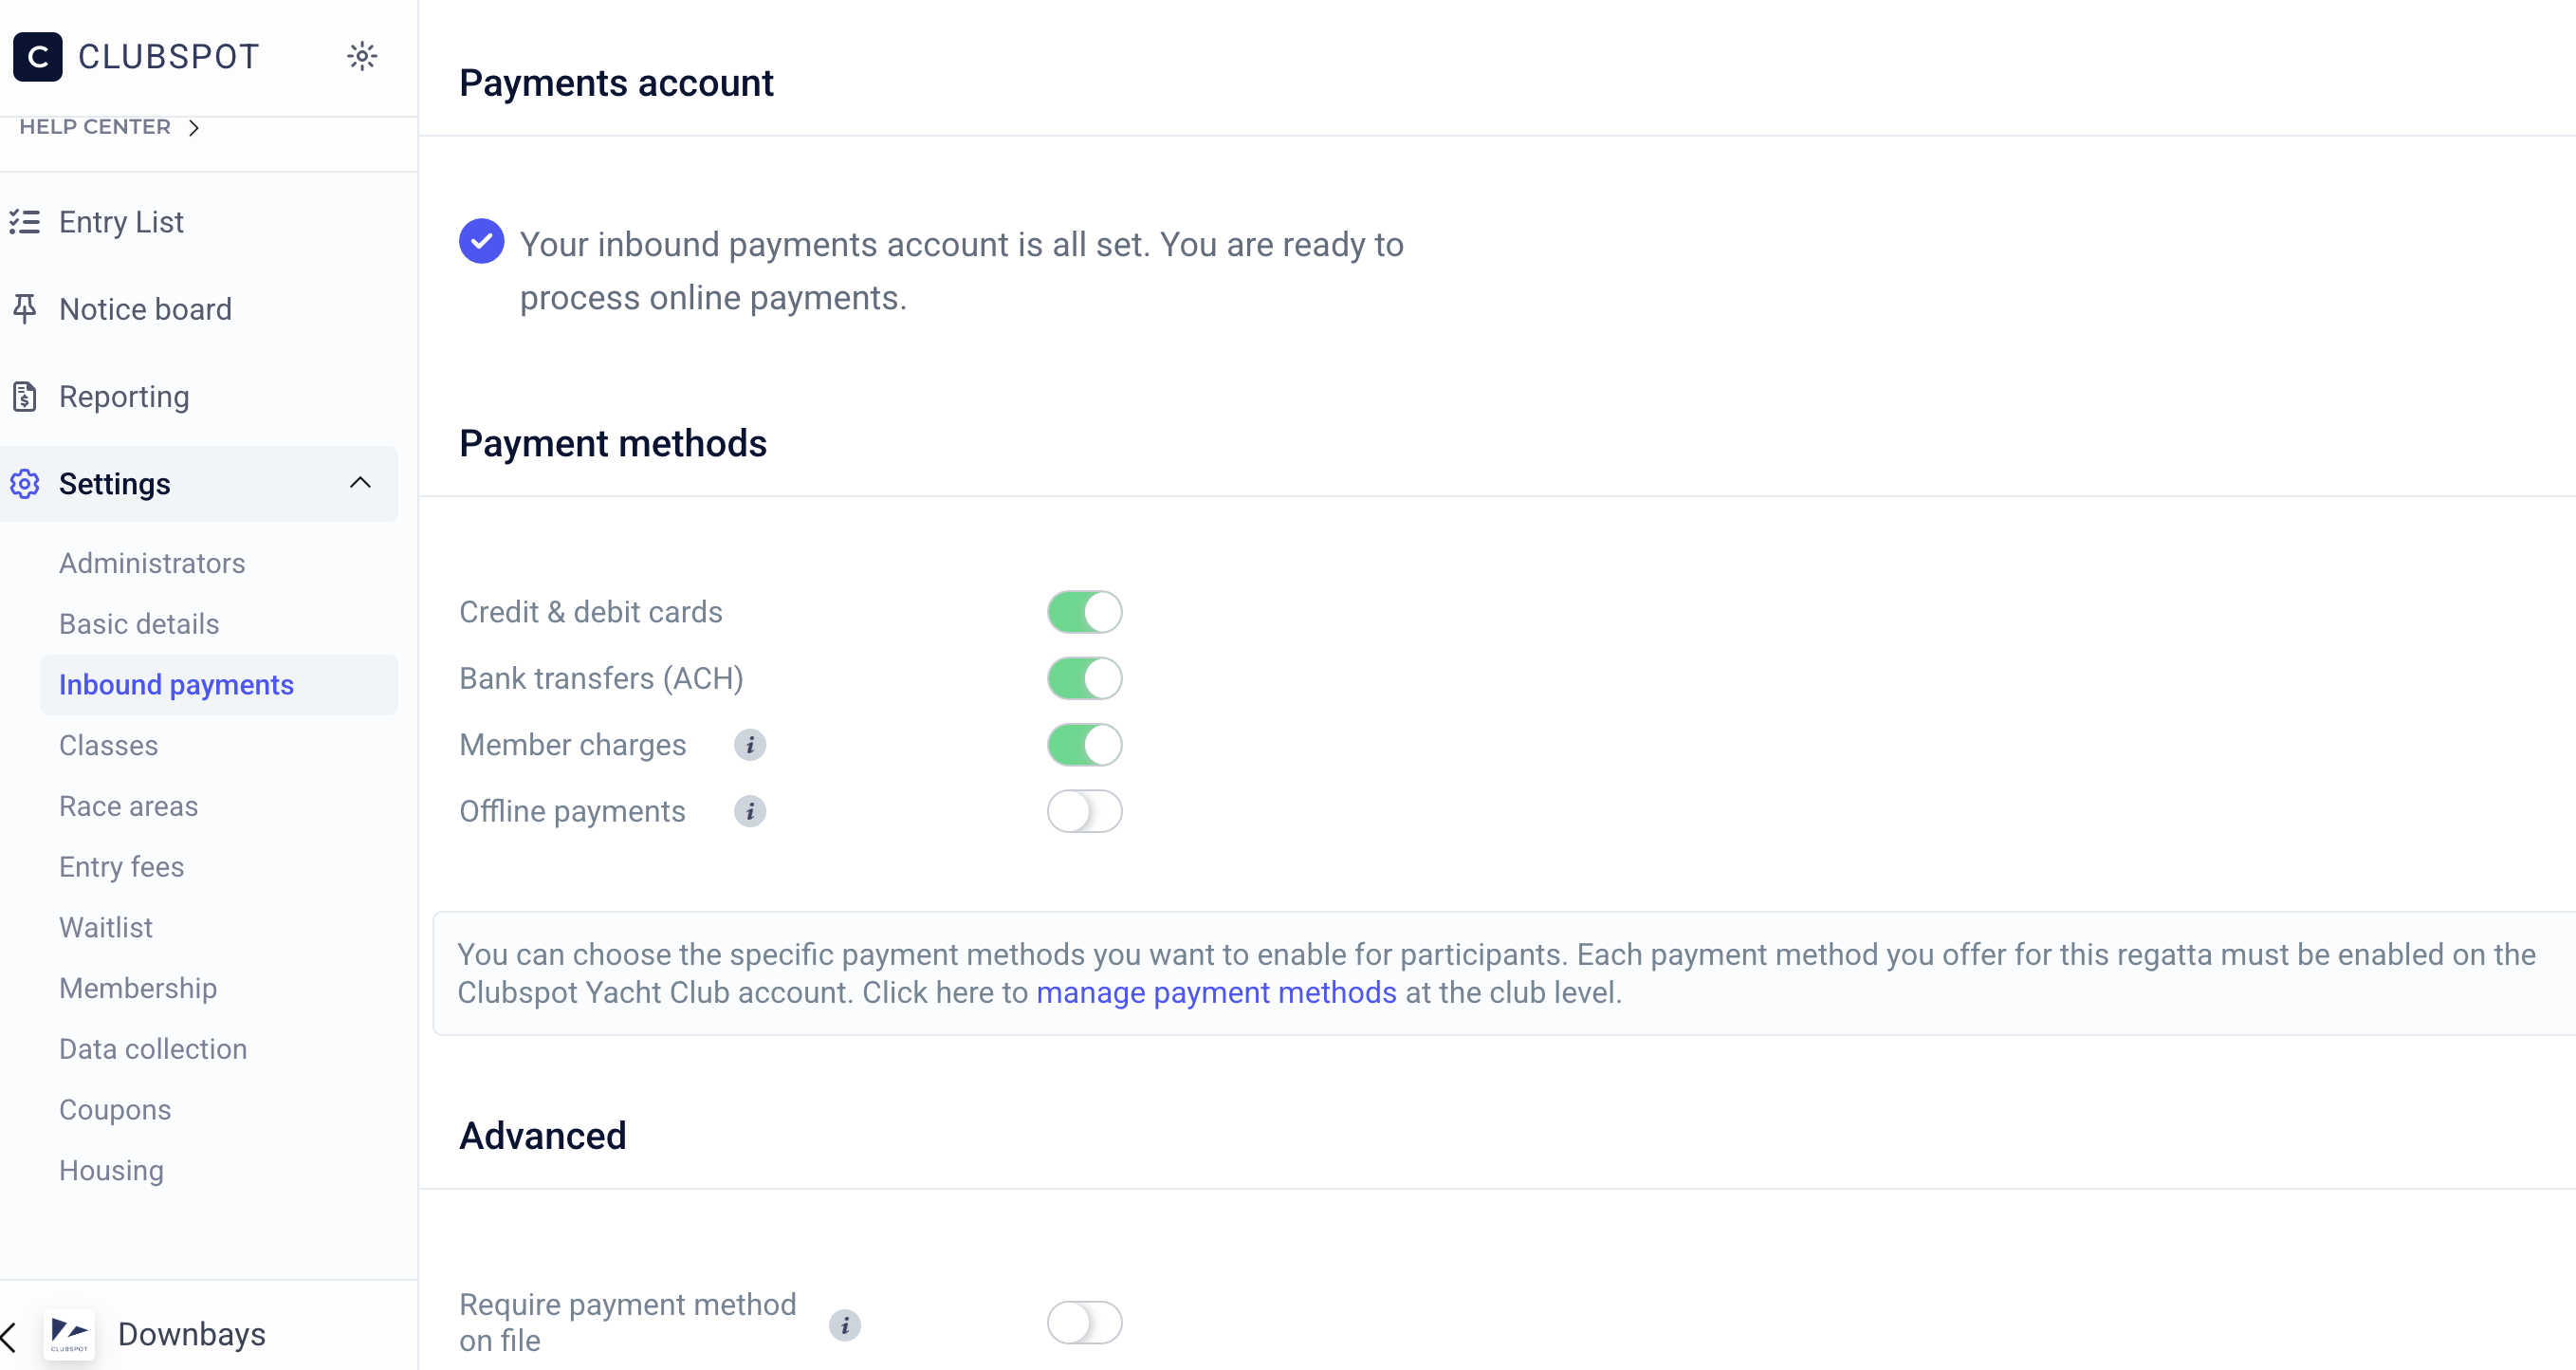
Next, go to Inbound Payments. Here, you can configure what payment methods are allowed at checkout. Toggle the payment methods you would like to allow participants to pay with at checkout. For example, if Credit Cards & ACH are the only toggles in green, participants can only register by paying with either of those methods online and will not let them register by paying via check or cash.
Step 4: Boat Classes
Next, go to Classes. Here is where you will create the boat classes that are racing in the regatta. Click “+ New Class” to start adding the different classes available for participant registration. Once you’ve created the different classes, there are a few more settings you can configure for those specific classes. Click into a class you’ve created and you’ll see a few more options you can set up if needed. Classes are required for registration.
Class Description
When you click into a class, you will see a text box for you to write a description of the class that will show on the participant registration page. Type in a description and then press the Update button in the bottom right corner.
Type
At the top, you can edit the name of the class or the type of class. Click the “Type” box and a dropdown will appear with the different options. The different options will configure how many crew members should be sailing. For example, if you are hosting a single-handed regatta (Lasers), you will want to make the type Single Handed so the registration form doesn't ask participants to list crew members.
Advanced Settings
If you scroll down, you have a few more options to configure if needed. You can set a minimum number of sailors per entry, an age requirement, make it members only, etc.
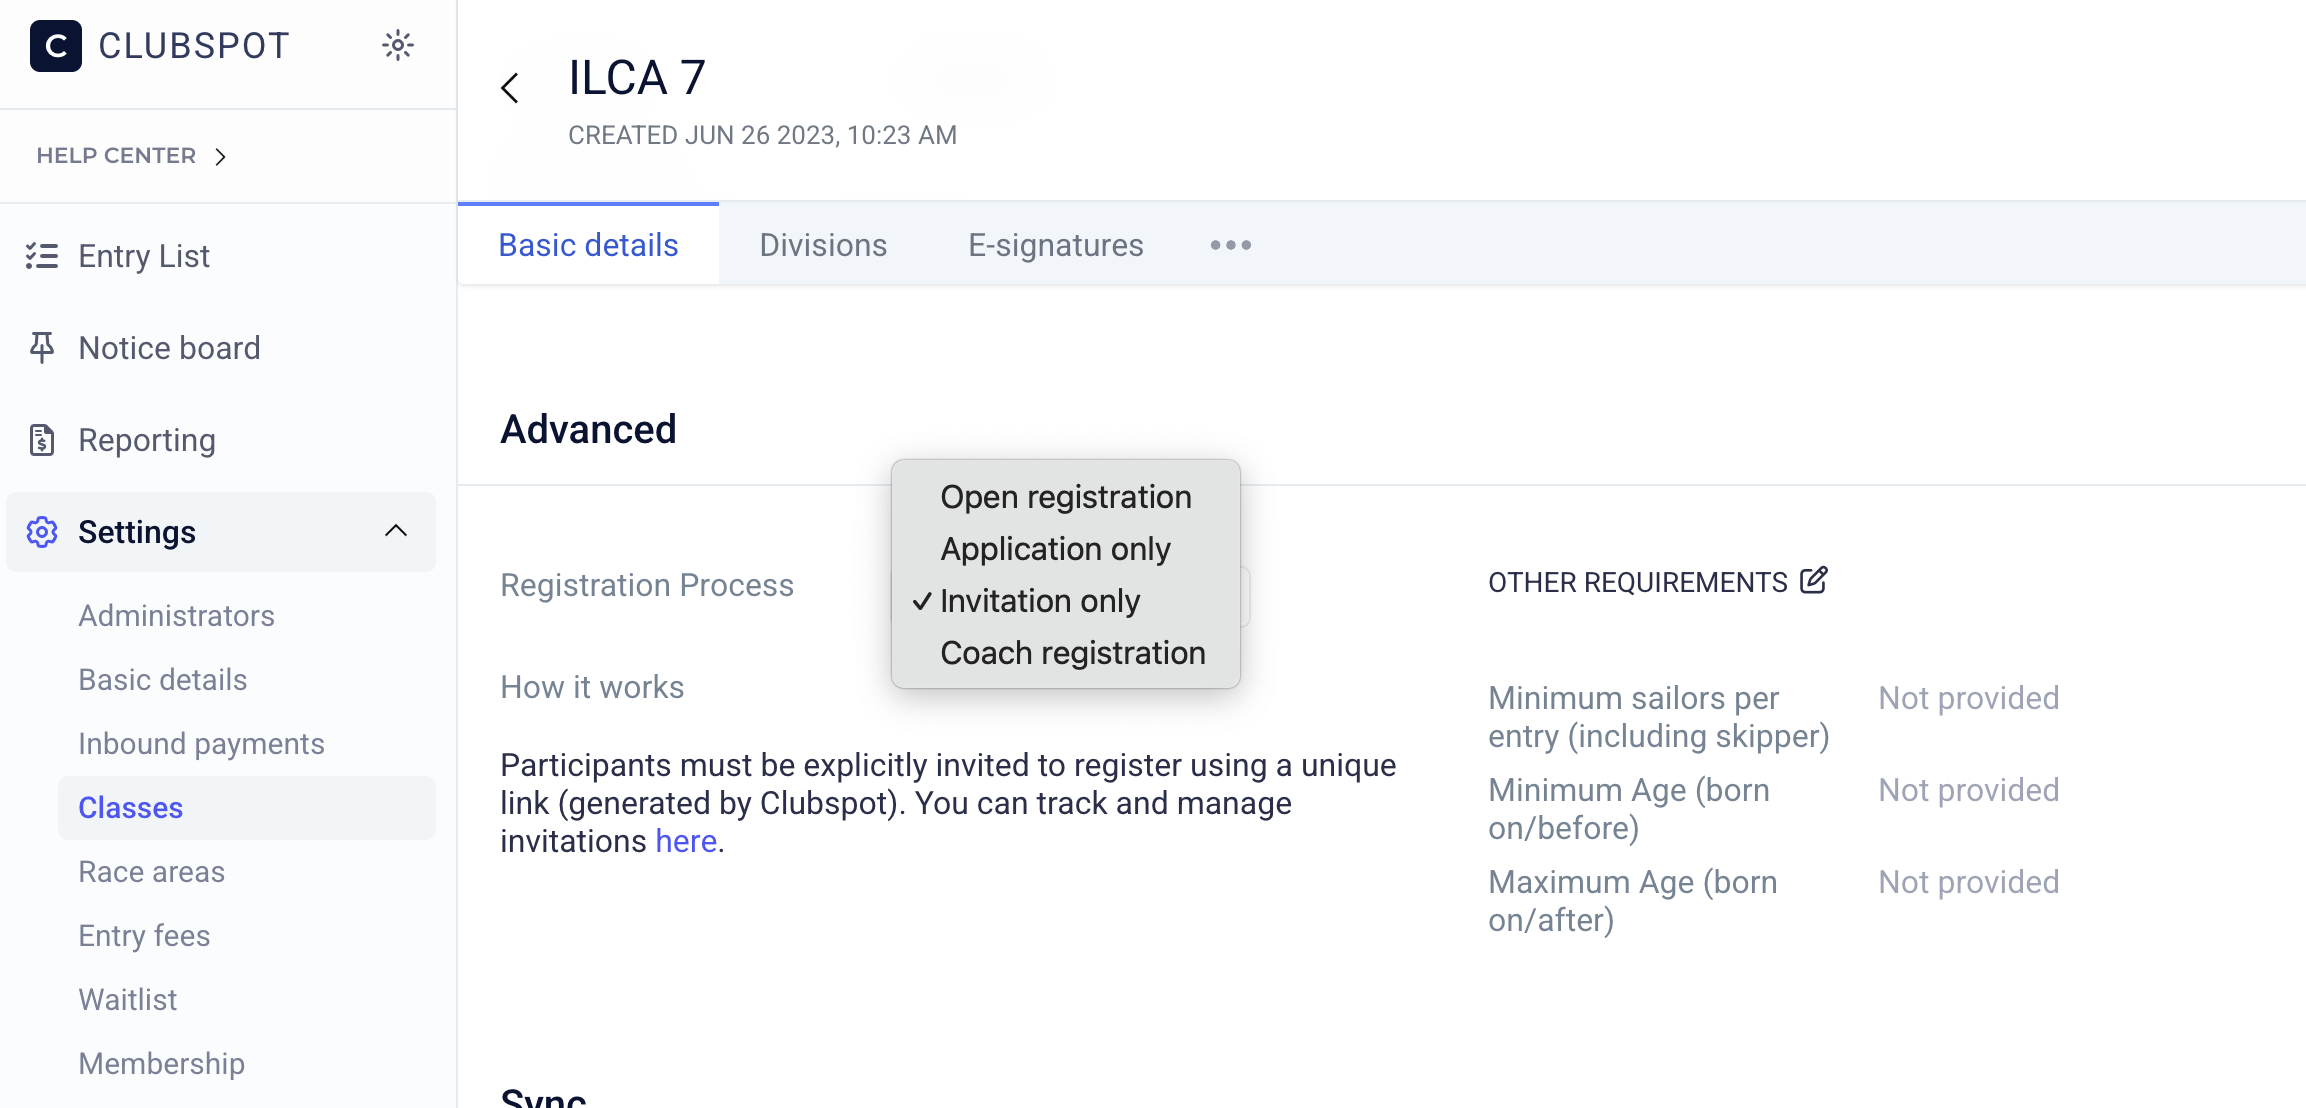
Invitation only is available at the Boat Class level in the Registration Process
Sync allows you to import registrations from other Clubspot regattas.
Divisions
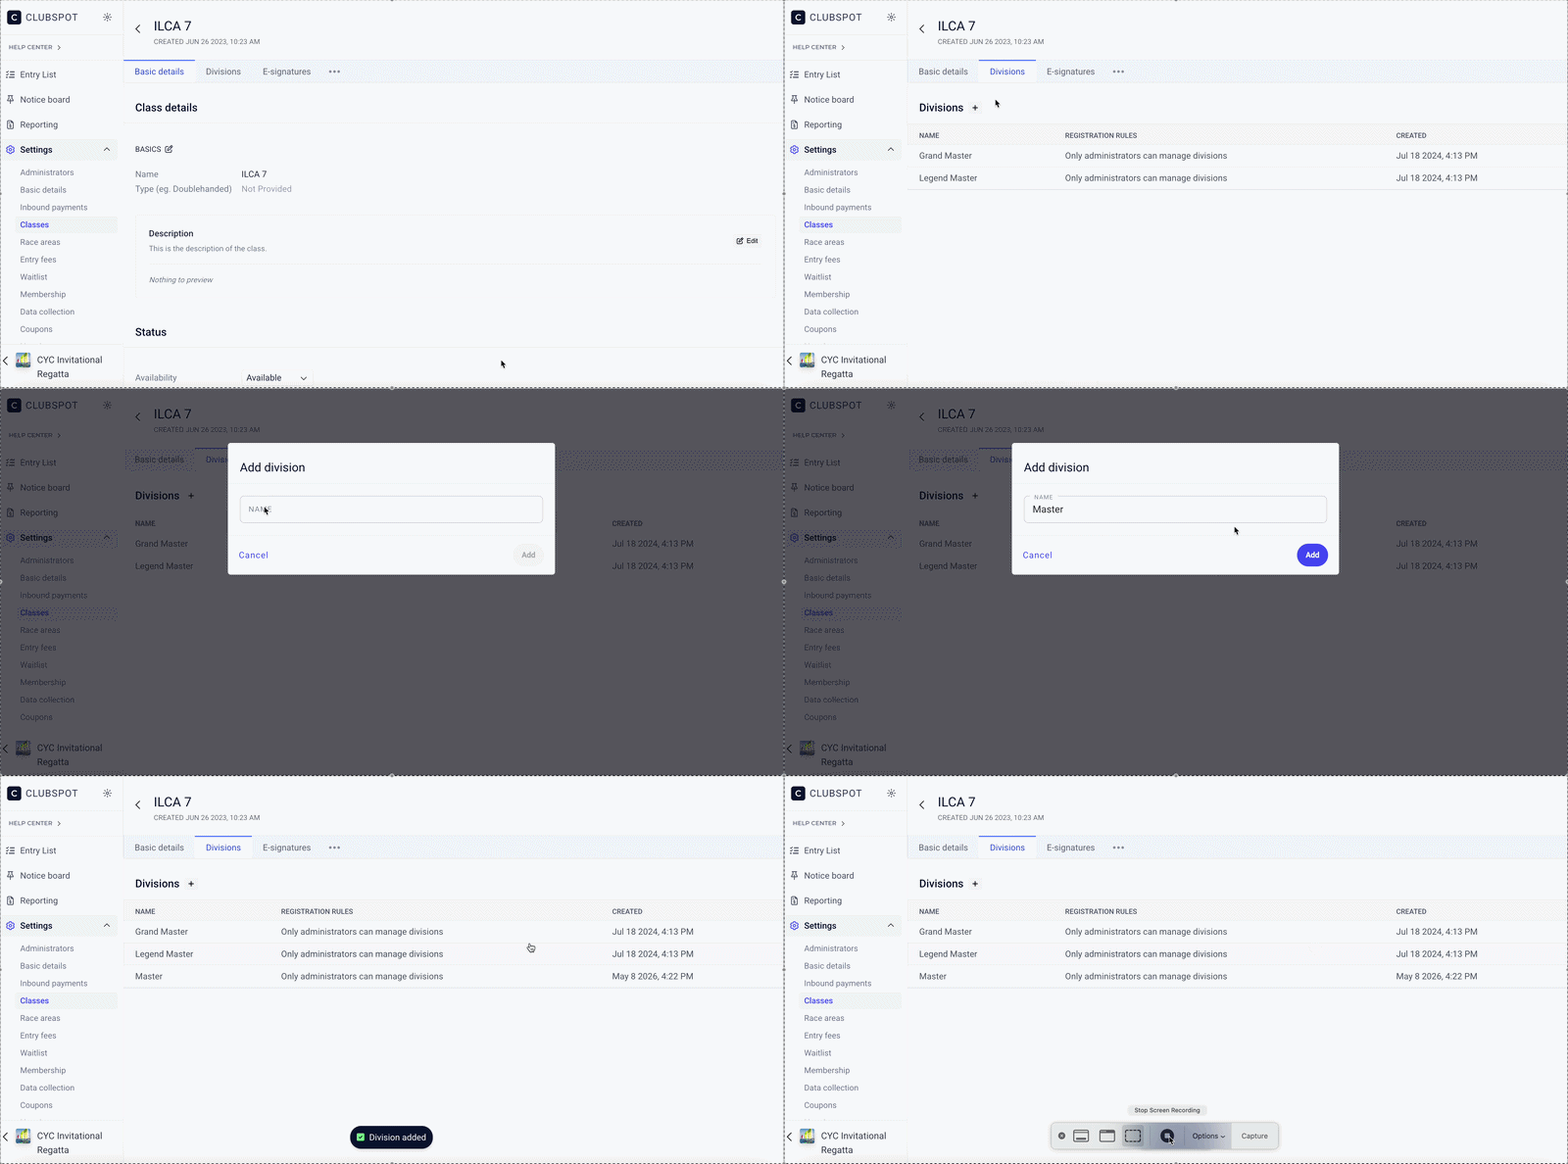
If you scroll to the top, there is a tab titled “Divisions.” Here, you can add divisions under the class for registrations. When you add the divisions, you can make the divisions selectable by the participant by clicking into the division and toggling on User Selection.
For optimist regattas, you will want to create the divisions with user selection off. As long as the name of the division(s) have the words Red, White, or Blue, Clubspot will automatically put them in the correct division based on their birthday. We also include a button to Re-Sort all entries in a class automatically by age, which is useful in the event Red, White, Blue divisions were not set up prior to opening up online registration.
Clubspot does have the ability to automatically sort Opti participants into the correct division. However, that only works if you set up a single Opti class, and then add white, blue, and red as divisions within that class.
If Regattas are set up with separate classes for white, blue, and red, and no divisions at all underneath those classes, the system will not perform the auto-sorting with this setup. Administrators can move participants from one class to another if the parents selected the wrong one!
Step 5: Entry Fees
The next tab under Settings is Entry Fees. Here you can enter in the prices for registration and member discounts if you plan to offer them. To configure an entry fee, simply click into the box next to the class and type in the dollar amount of the entry fee.
Clubspot also gives admins the ability to set up Early Bird or Late Fees. At the top of the page there is a “+ add date window” button. When you click that it will prompt you to define the date window (ie for a late fee, select “After this date” and then enter in the date and time that the late fee will start). Once you’ve done that, you’ll see that it creates a tab at the top of the page next to the “Regular fee” tab. In the new tab you’ve created, enter in the prices that participants will pay after that date window.
Please note, do not enter in the additional amount you want them to pay for the late fee, enter in the total price. For example, if the regular fee is $60 and the late fee is $80, you would enter $80 into the late fee window for that class, not $20 (the additional amount).
Step 6: Waitlist
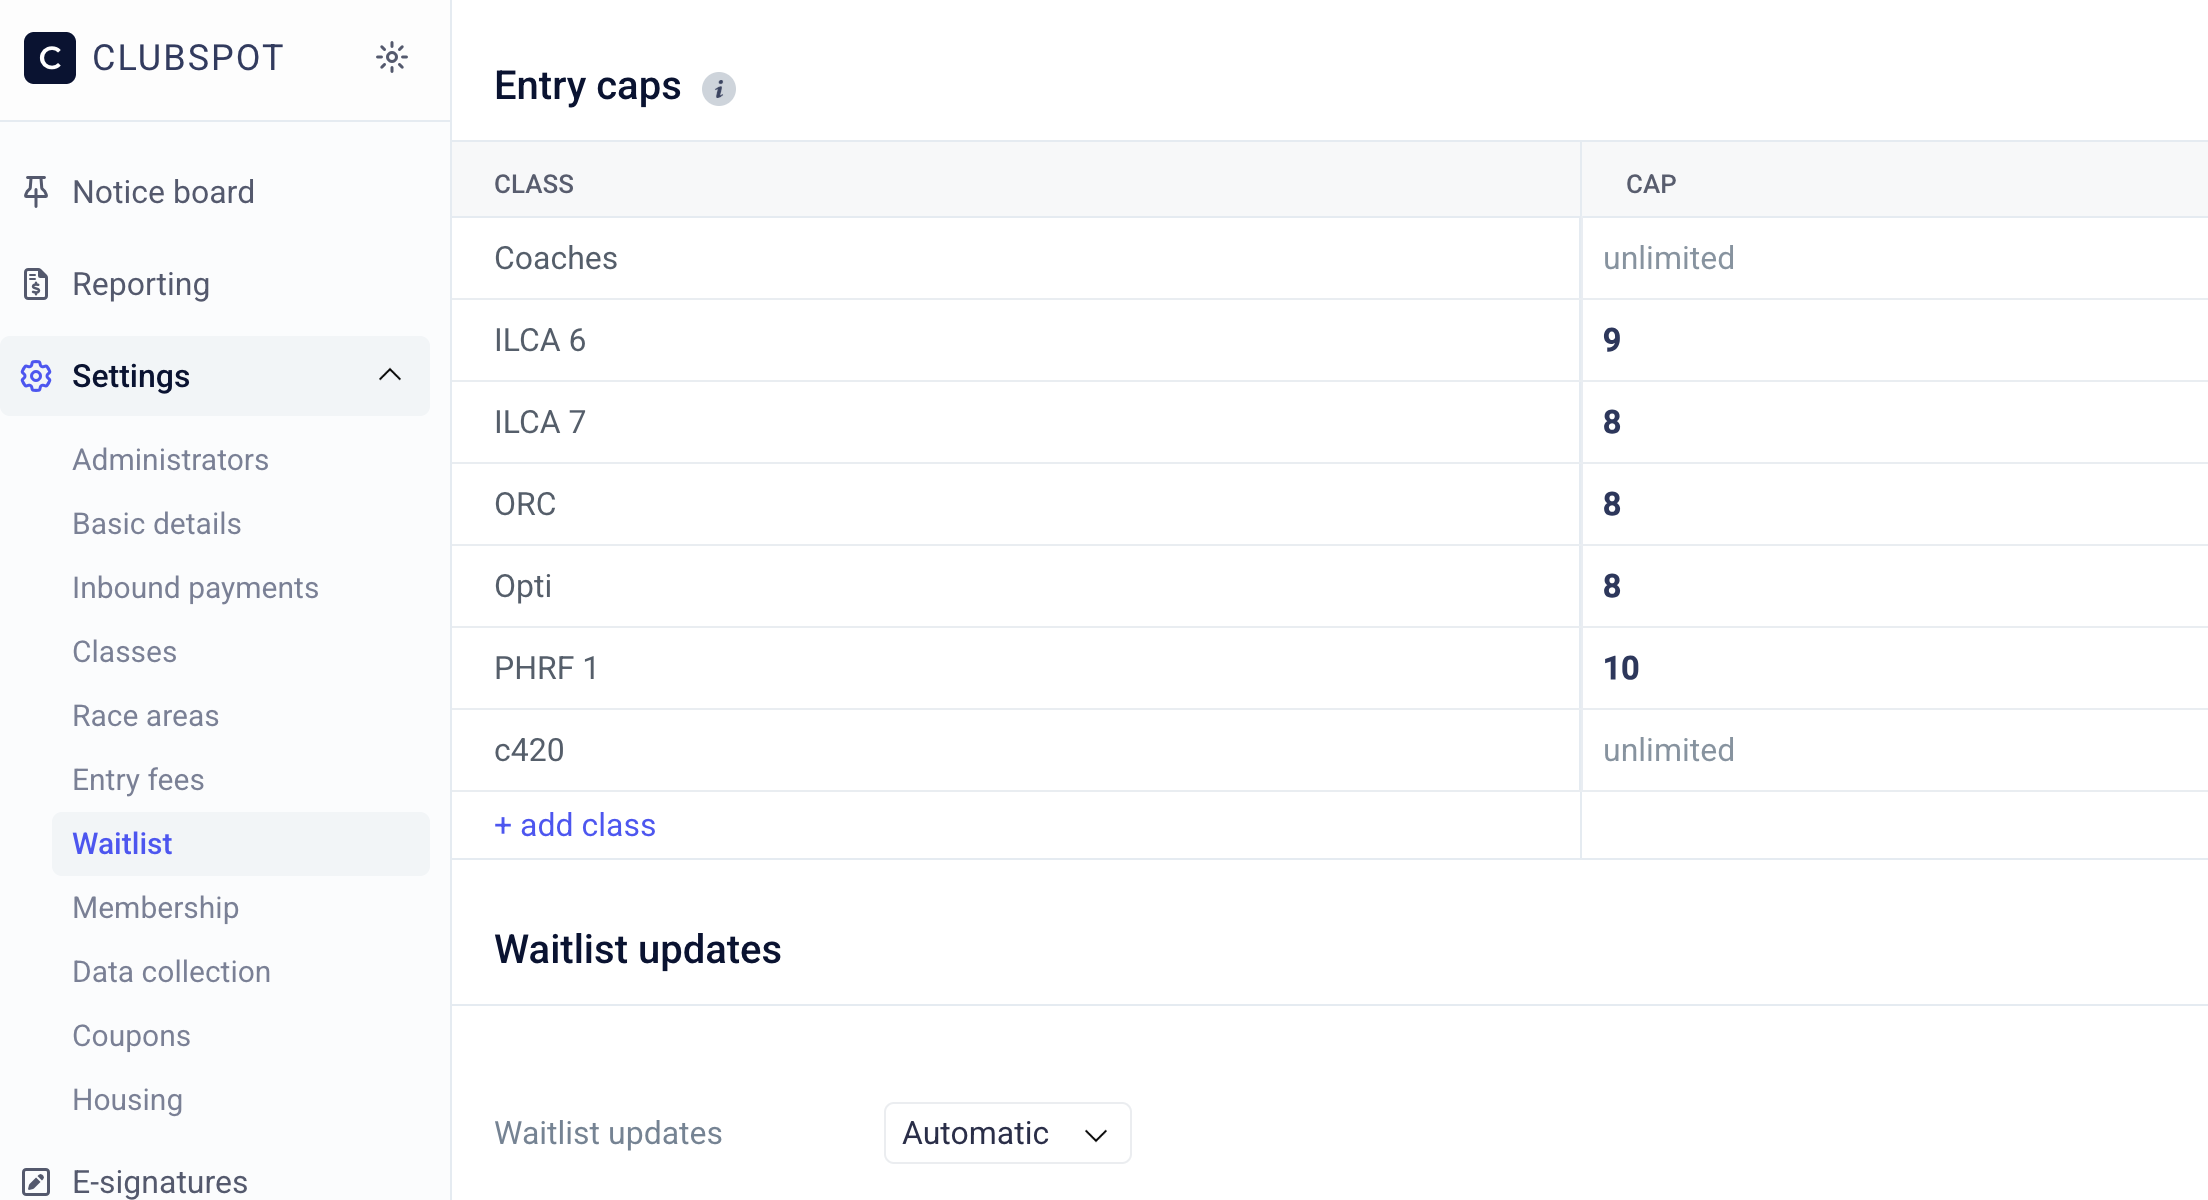
Next, you can set entry caps under the Waitlist subtab. If you want to limit the number of registrations for the regatta, simply click into the text box and enter in the number of participants allowed for the regatta. Then, click the update button in the bottom right to save your changes.
Waitlisted participants will not be required to pay up front. Clubspot will automatically generate a draft invoice that you can send at a later date (if and when the participant is admitted).
Step 7: Membership Validation
Next, is the Membership subtab. Here, you have the option to add membership validation to registration. For example, if you are hosting an ILCA regatta, you will want to click the “+Add Validation Button” and scroll down to ILCA NA. From there you can make it optional or required.
As a note, if you’re hosting the event standard membership validation is required at the beginning of registration whereas the flow is a bit different when another club is hosting the event. Classes will be restricted to those not a member of the host club.
Step 8: Registration Form
Finally, is the Data Collection subtab. Here is where you will setup the registration form . At the top are a few of the most commonly asked questions for regatta registrations. Simply toggle on the fields you would like to collect from participants. If there are questions you would like to ask participants but they are not listed, you can create custom fields.
To create a custom field, click on the “+ Custom Field” button in the bottom right. Here, you will be asked to type the question and then select what type of question this should be (text box entry, dropdown, multi-select, etc). Once you’ve created the question, click on it and you will be able to edit the settings of the question such as the title of the question, is it required or optional, if it applies to the skipper only, or which classes this custom field should apply to.
If the Skipper Only status is toggled ON, then any custom question that has an extra cost associated with it such as a t-shirt, dinner ticket, lunch, etc will only be asked during the skipper’s registration checkout.
When creating a dropdown or multi-select question, you will need to then configure the options for the question. You do this by clicking into the custom field once you’ve created it. Here, there is a tab at the top called “Options.” Click on that tab and you will see a button for “+ Option.” When you click that, it will ask you to enter in the title of the option and if there is a price adjustment for that option. For example, if you wanted to ask participants if they have sailed this regatta before and give them a $5 discount if they have, you would create a dropdown custom field “have you sailed this regatta before?” then click into the custom field and add an option for “No” with no price adjustment and then create another option with “Yes” and enter in -5 in the price adjustment box
We now support the ability to configure conditional parent/guardian data collection, based on the participant’s date of birth. This is very useful for mixed youth and adult classes.
Step 9: Adding a Waiver
Now that the settings are configured, you can add a waiver to the registration process. You do this by clicking on the E-signatures tab on the left, click “Templates,” and click add template to upload the waiver, then select the classes you'd like it to apply to.
Step 10: Sell Products via Registration Page!
Lastly, if you want to sell products at the regatta and on the registration page, click on the Products tab to the left and add products you would like to sell. You can add different prices for the product and different options for the products (ie T-shirt sizes) by clicking into the product details similar to adding custom fields.
Step 11: Publish your Regatta
These are the basic steps for setting up a regatta. If you have configured all the settings for the regatta and want to share the event details for participants to register, click on the Links tab on the left side tool bar and share the “Event Details” link via email or post on the club’s website. If your club is using Clubspot for the website, all you have to do is go to Settings tab, click on Basic Details, and click the Publish toggle for the event to show up on your club’s calendar.