Tables & Floor Plans
Floor plans allow you to build out your dining operation with tables to easily visualize reservations and orders on the Point of Sale.
Tables, Zones, and Areas
When you setup tables in the system you will be asked to assign them to zones, and areas.
Zones
Zones are subsets of your tables, often serviced by a single staff member. Some common examples of zones are, Patio - Left, Booths, Main Dining - Center, or Lounge. Zones get assigned to a location and determine what tables are available at that location. If you don't require a specific zone, use the same name as the Area.
To assign a zone to a location, go to the Point of Sale tab and click into Locations. Select dining on the top bar and then click the three dots on the right-hand side of the page to add any zones to that location.
Areas
Areas are used exclusively for dining reservations. For example, you may want members to be able to make a reservation for the patio versus the main dining room, but you likely do not want them to be able to directly decide what zone they are seated in.
Once you have tables with zones set up and those zones are attached to a POS location, you are ready to use the Layout editor.
Creating a Floor Plan
Under Dining, select “Floor plans.” This page will show you all of your existing floor plans, and you can use the + Floor Plan button in the top right to add new ones. When you create a new plan, you will be prompted to select its corresponding POS location. You may make more than one floor plan per POS location.
Layout Editor
From Dining, launch the layout editor to begin building out your table's layout.
To add tables to your layout, select the + icon next to the table you would like to add. Drag and drop to move the tables around your layout, and adjust the “type” dropdown to select the type of table to add. Note the sizing and rotation abilities when you select any of your tables.
If you do not see the tables you are expecting, make sure that those tables are assigned to zones, and those zones are included in the POS location in question.
When you are done configuring your floor plan, you can publish your changes to push that update to your Floor Plan. The editor also allows you to add shapes and edit the tables directly in your editor. Be sure to keep in mind that reservations may already be made for your tables or may be available for tables not included in any of your floor plans.
Enable in the Point of Sale
Floor plans allow you to view your tables in the Point of Sale application directly.
To enable floor plans, open Settings and ensure that you have both Restaurant Mode and Floor Plan View enabled. Once enabled, navigate to the Tables section to view your layout.
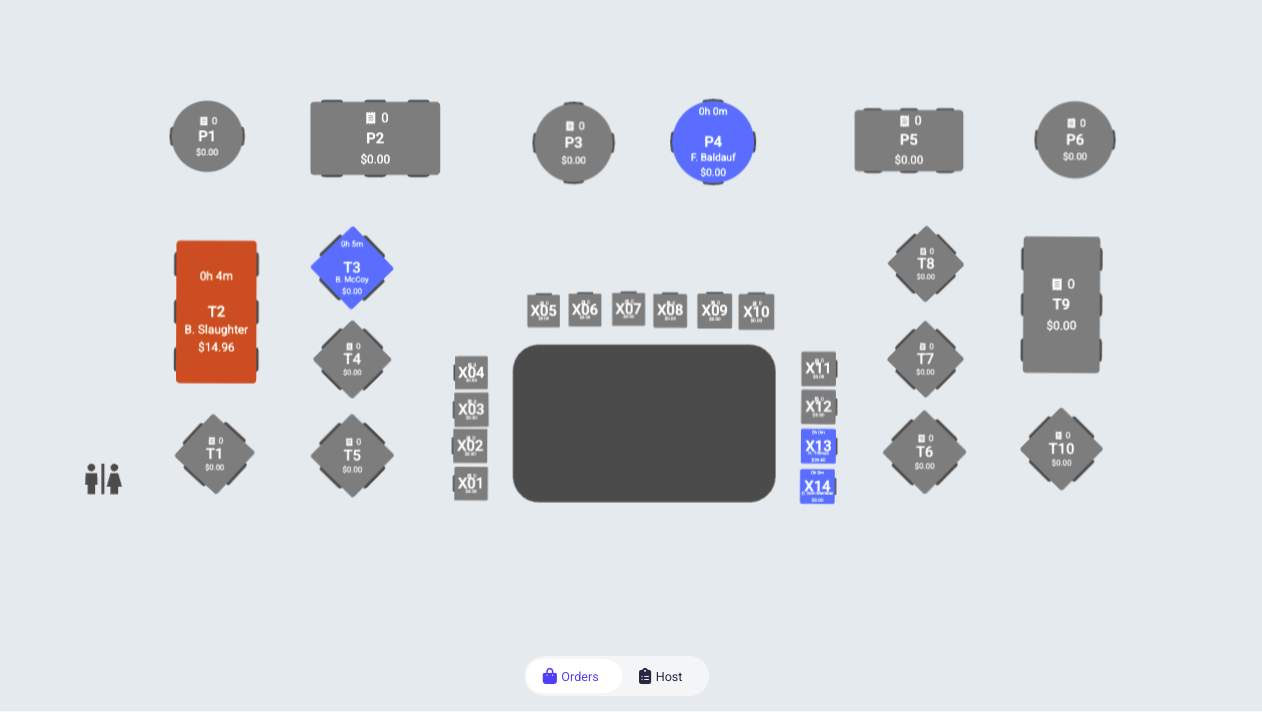
Tables will work similarly to order tiles. You can add orders to tables, and those orders will light up the corresponding tables. The map dropdown allows you to swap to a different layout for that same location.
Color Coding
Dark Gray - Table with no orders
Blue - Table currently has items that have not yet been fired
Orange - Table currently has an order where all items are fired
Tables include counters for the number of orders and will display the order total as well as the time since the first order was opened. Servers can toggle between the tables and the orders view based on their preferred workflow.